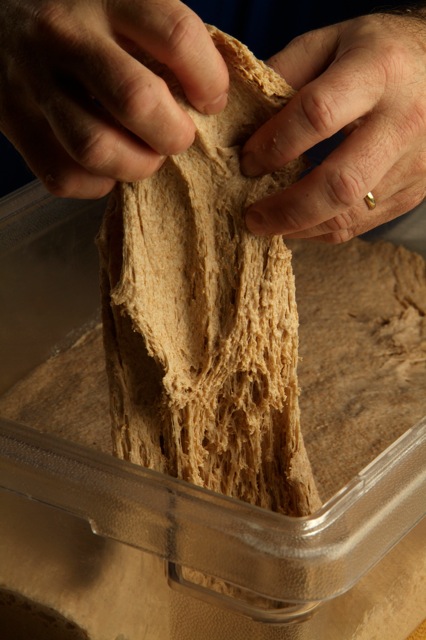
The Stretch and Fold Method
 In some of the recipes that we’ve posted I refer to stretching and folding the dough, so I want to more fully explain it here, as I will continue to provide recipes that utilize this technique. The stretch and fold method (S&F from here on), is a remarkable way to maximize gluten development in a dough with minimum mixing time. It is sometimes referred to as “intermittent kneading” and also by the term “folding.” All of these refer to a similar method, though the time intervals may vary from recipe to recipe. In short, it means to intermittently fold the dough over onto itself during the fermentation stage. What this accomplishes is to strengthen the bonding of the gluten protein threads that hold the dough together and thus trap the carbon dioxide created by the yeast. This is what creates the bubbles or air pockets that we refer to as the “crumb” in the final bread.
I suggest this technique more and more often in my classes and recipes, as it allows us to more fully hydrate the dough, almost to the point of over-stickiness, yet still create a very workable, dynamic dough, one that pops in the oven and creates more of the large irregular holes that artisan bakers (and consumers) love to see. The method is actually quite simple and I have short video that illustrates this at: http://www.youtube.com/watch?v=1timJlCT3PM .
To work with sticky dough many bakers use flour on the work surface and on their hand, but I prefer to use an oiled work surface (either olive or vegetable) and either oil my hands or dip them in water (sticky dough won’t stick to wet or oily hands). All you have to do is to transfer the dough from the mixer to the oiled work surface, pat it into a rectangle or ball, and then pull, or stretch out about half of the dough from one side and then flip the stretched piece back over the top of the dough, about to the middle. Then repeat this from the other three sides, stretching and folding half the dough back over the top of the dough. Then, when all four sides have been folded over, flip the whole dough ball over so that the smooth underside is face up and the folded top is underneath. At this point, you either place the dough into an oiled container or leave it on the oiled work surface and cover it with a bowl. (As I said, some bakers prefer to work with floured surfaces instead–that is totally up to you.)
You can repeat this S&F at 5, 10, or even 45 minute intervals, depending on your baking schedule for the dough in question. For same day bakes, three or four S&F’s at 30 to 40 minute intervals are common, which allows the dough to ferment in between the S&F’s. For overnight dough, such as pizza or focaccia or certain rustic bread formulas, the S&F intervals can be as short as 5 minutes. Typically, four S&F’s are sufficient to fully develop and firm up the dough, but some doughs require only one, while others might require five S&F’s if they are very wet.
This technique greatly enhances the oven spring and causes the dough to achieve a kind of bounce and liveliness that is hard to replicate by conventional mixing methods. It also allows us to push the envelope regarding hydration, sometimes making it possible to add as much as 5% to 10% more water than the recipe calls for. And most importantly, it’s also a lot of fun and gives great pleasure to watch and feel the dough get stronger and more vibrant with each S&F — yet another reminder that we’re working with a living, dynamic product.
Recent Articles by Peter Reinhart
- Peter Scott Ruben: Why Frank Sinatra is the true “Chairman of the Board,” and the Greatest of the Greats
- Elizabeth Brasch, Mellow Mushroom’s Has a Vision
- Nipun Sharma: Pizza’s A-I Robotics Future is Now
- Maui Pizza with Chef Jeff Scheer of Restaurant Marlow
- The Pizza Yodi’s Are Back –John Arena and Brian Spangler are in the House!
- Arthur Bovino and Alfred Schulz and Their Pizza Pod Party
Add Comment
You must be logged in to post a comment.


I make my dough in large batches, chill overnight, then shape, place on greased pans, cover lightly with a brush of olive oil and saran, and freeze until solid. The frozen balls can be placed in zipper bags for storage. When I want a pizza, I thaw until puffy, shape and bake. ‘Almost’ instant pizza!
Is there a way to adapt this technique for commercial use for the amount of dough (100 lbs?) one gets from a 55 lb. bag of flour, or maybe two mixes of 50 lb of dough each? It seems that it would be hard to stretch-and-fold 100 lbs. of dough! The idea is to be able to make commercial quantities of pizza dough without having to buy an 80 qt. commercial mixer. How did they do it in the old days?
Yes, I’ve seen large batches of dough stretched and folded by hand in bakeries. If you don’t have a tub or trench big enough to handle all that dough, divide it into 2, 3, or 4 dough boxes and do the s&f in those–it goes fast, just a few seconds per box.
As for Nancy’s tips, great idea–bravo!!
When to do the s&f’s? I like to do all the s&f’s at 5 minute intervals beginning right after the dough comes off the mixer, but you could also do it at longer intervals to give the dough more fermentation time–it really depends on how you plan to handle the dough after all the s&f’s. If you try to cool down a large piece of dough it could over-ferment, even in the refrigerator, so shorter intervals might be better. But there’s a wide window of tolerance for some bulk fermentation during the s&f’s so play with a system that works for you. Some people prefer more fermentation than others; for me, it’s more about the enzyme development during the overnight refrigeration period, so I do minimum fermentation prior to refrigeration since it takes a while for even dough balls to cool down. But that’s just me–would like to hear what others have found to work for them.
Peter,
One thing I am having a tough time understanding in your book. After I mix the ingredients and form into balls, I place them into the refrigerator for the cold rise or place any extras into the freezer for storage. so my question is if I decide to freeze the dough at this point you said to take it out a day before to let it thaw in the fridge- will this one day thaw also allow it to have the cold rise that the other dough had? I want to be able to have dough ready on the fly, but if it tastes better by doing the 1 day thaw then I guess that wouldn’t be so bad.
Also, could you adapt your dough recipe for the bread machine? My bread machine’s dough cycle for pizza is 45 minutes, will this work? Seems like your recipe by hand is much quicker, thanks!!
Peter,
You have taught me so much about making an amazing Pizza.
If using the S&F technique do you believe is is not necessary to apply the “autolyse” technique in the mixing phase?
Thanks,
Mark