

Insulating the Oven

Introduction
After you have assembled and sealed the oven chamber, you are ready to insulate your oven, and in the case of the Firenze Concept Oven, build the wire frame to shape the Igloo.
The basic process is to first wrap the oven, vent and chimney with the insulating blanket; build a wire form to the shape that you like; the fill the wire frame with the insulating concrete.
Technique
The insulating blanket we used in the Firenze oven is not as efficient, or easy to work with as the product we provide with the Casa, Premio and Ristorante ovens. If you are a Pompeii oven builder, we recommend that you consider an insulating blanket, along with the vermiculite insulating concrete, because of its efficiency.
Wrap you oven and vent with the insulating blanket, overlapping joints where ever possible.
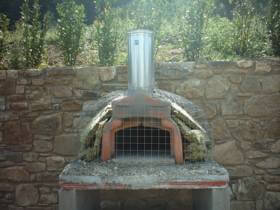
Next, build a form using a wire sheet to the shape you want for your oven. There is more than one type of Igloo style, so feel free to pick the shape you like. You can use either fine chicken wire, or heavier wire set on a larger grid.
We used heavier wire netting, based on a 2″ grid. The oven used two sheets that were roughly 3’x’5′, which we tied together with wire and wrapped around the oven, leaving 3″-4″ of space for vermiculite insulation. The larger wire pattern had its pluses and minuses. It was strong and held its shape though the larger pattern allowed some of the vermiculite insulating concrete to escape when we poured it.
You might want to consider using both a larger mesh (or pencil rebar) for strength and a chicken wire to define your exact shape and to hold the vermiculite insulation.
We cut the wire net every 10″-12″ around the dome, down a little more than half way, then folded the mesh folds down to the center above the dome, and held them in place with wire ties. We did extra cuts and bending to reach the shape we wanted.
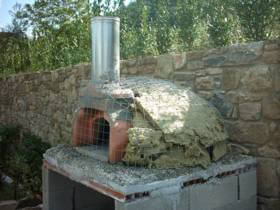
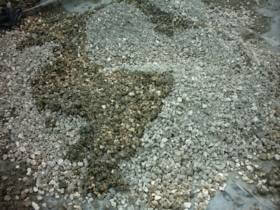
The next step was to add the vermiculite insulation. As we have said elsewhere in our installation pages, the trick to making vermiculite and Portland cement work together is the mix them dry (graphic 3), where the cement coats the vermiculite beads — before you add water.
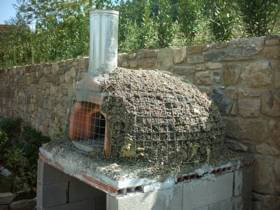
Make a mix similar to oatmeal, and layer in on the oven, so that it is held in place by the wire frame. We set our wire frame in place to allow for 3″-4″ of vermiculite concrete all around the oven dome and 1″-2″ around the vent and chimney.
We came back and added a layer of vermiculite concrete around the vent and chimney after the oven had been insulated (graphic 5), to make sure that these pieces were insulated as well. You can either insulate the chimney and vent along with the rest of the oven, or you can do it later as we did after the decorative arch was installed.
At this point, we moved right to the next step: Stucco your Oven.