

Bella Pizza Ovens:
Get Yours for the Fourth
In last month’s newsletter, we introduced Bella Outdoor Living, a Forno Bravo company with a new market focus and exciting collection of products: beautiful stainless steel pizza ovens and grills.
The Bella pizza ovens are in stock and ready to be shipped right away (free shipping on every item) – just in time for the Fourth of July!
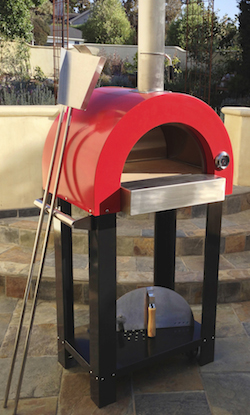 Nano C22
Modern and efficient, Bella stainless steel pizza ovens combine the simplicity and ease-of-use of a grill with the fun of authentic Italian wood-fired cooking.
Bella pizza ovens are fully assembled and available as freestanding carts, in islands, and as drop-in appliances for your custom outdoor kitchen. The ovens feature all 304 stainless steel and continuous weld construction so they won't wobble, rust or break down.
Bella pizza ovens give you incredibly fast heat-up times. That's because the oven cooking chamber is made from beautifully shaped stainless steel that reflects the heat of your wood fire onto the cooking floor and food. A Bella pizza oven can heat up to Pizza Napoletana temperatures in as little as 15 minutes.
Like the best commercial pizza ovens designed for 24/7 use, the Bella pizza ovens feature thick, ultra-premium, 100% ceramic insulation, which means the oven stays hot on the inside and cool on the outside. (The cooking chamber easily maintains a constant 800ºF.)
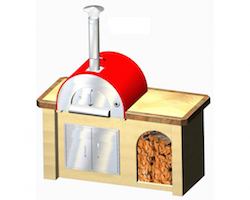 Cucina P75
Explore:
Bella Pizza Overview
Pizza Oven Islands
Pizza Oven Carts
Pizza Oven Drop-Ins

Welcome
We hope you've been enjoying your summer so far. This season brings many wonderful opportunities to use your outdoor ovens – entertaining lively gatherings of family and friends with a full feast, or simply cooking a pizza for one (sometimes there's nothing better).
At Forno Bravo, we believe cooking in a wood-fired oven is one of life's true pleasures. Few things compare with the experience of firing your oven, watching the flames heat the dome, and cooking some of the world's best pizza, bread, vegetables, roasts … the list goes on. For those looking to explore the joy of wood-fired cooking, we are proud to add some beautiful new oven options: the Vesuvio (more below) and the Bella Outdoor Living stainless steel ovens (to the right).
To round out our June newsletter, we've included a recipe for Juicy Lucy burgers. These would be a delicious item for your Fourth of July menu. Remember to share your holiday culinary creations on the Forno Bravo Forum, Community Cookbook and Facebook page.
Here's to savoring your summertime – and those wood-fired meals!
James
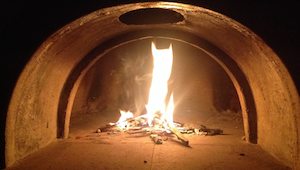
P.S. The header photo, upper right, was shared by Forno Bravo friend Melissa on our Facebook page: "The Cure, Day 1."
Special Preview: The Vesuvio

We are excited to give our newsletter subscribers a special preview of a new residential oven before general availability: the Vesuvio!
We are offering this oven in response to the high demand for authentic hand-tiled ovens.
These beautiful ovens are available in 32", 36", 40" and 44" cooking surfaces, with or without a stand.
Like all Forno Bravo ovens, the Vesuvio is built using high-tech refractories and space-age insulators, ensuring optimal high-temperature baking performance for perfect Pizza Napoletana and excellent heat retention for baking and roasting.
We are accepting pre-orders (the Vesuvio isn't on our website yet).
Please contact 800-407-5119 or sales@fornobravo.com for pricing info and to move to the front of the orders line!
Recipe: Juicy Lucy Burgers
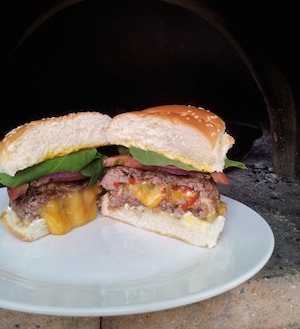 We hope you enjoy this recipe from the Forno Bravo Community Cookbook – a great addition to your Fourth of July menu!
Claims to the origination of the Juicy Lucy are hotly debated, but we do know the first versions emerged from Minneapolis, Minnesota, and spread around the country from there. And anyway, who really cares? It's a burger with gooey delicious cheese in the middle. That's what really matters. I made two versions for this recipe, one plain-old cheese-filled patty, and one with the addition of pickled hot peppers. Let your imagination run wild. Just remember that, as with topping a pizza, moderation in stuffing a patty is key, or you'll never get the burger to hold together. – Dan
- 24 oz your preferred ground beef
- 6 oz colby cheese, or whatever you decide to use
- 1 oz pickled hot peppers, or make your own (see below)
- 4 hamburger buns
- lettuce, tomato, red onion, mayo, mustard – you know the drill
- salt and black pepper, to taste
Divide the ground beef into four 6-ounce portions. Then divide each portion into two balls, about two-thirds to one-third by weight. To form the patties, it helps to have a ring mold somewhere around 4 inches in diameter. You can also use a large cookie cutter, or even the lid to a sour cream container in a pinch.
Pat the larger portion of the patty out into a flat disk the diameter of your mold and place it inside. Form a lip around the edge so that you have a meat crater. Place 1.5 ounces of shredded cheese inside the crater. Add a scattering of peppers if you desire.
(If you want to make your own pickled hot peppers, it's really easy. Bring to a boil 1 cup of white wine vinegar, 2 cups of water, 1 teaspoon of salt, 1/3 cup of sugar and a clove of garlic. While you're doing that, slice your preferred hot peppers into thin rounds. When the brine boils, pour it over the peppers. Cover with plastic and let sit for at least 15 minutes.)
Pat out the smaller portion of meat into a flat patty large enough to cover the crater. Place it on top of the cheese. Using your fingertips, poke down around the outside of the patty to crimp the two sides together. Remove the mold and check the patty for holes. If you find any, pinch them together the best you can. Repeat with the other three burgers.
Refrigerate well. When you're ready to cook, season with salt and pepper. Preheat a cast iron pan or your favorite burger cooking implement in your wood oven. Cook the burgers until they're warm inside. Remove, put on a bun, top as you see fit, enjoy.
![]()
![]()
![]()
![]()
![]()
Not signed up yet? Click to subscribe to the
Wood-Fired Newsletter. ![]()
Looking for back issues? You can find an archive of all the Forno Bravo Wood-Fired Newsletters on fornobravo.com.
If you have a question or recommendation about this Wood-Fired Newsletter, or anything else where we can help, please don't hesitate to contact us.
The Sales and Service Team
Forno Bravo
251 W Market St
Salinas, CA 93901
(800) 407-5119
info@fornobravo.com